Mobility Challenge: Let's mobilize.
Mobility simply put, is easier movement through any range of motion. In order to gain mobility, we must first address the fascia. Fascia is connective tissue that surrounds the muscles, bones, nerves, and organs of the body. For our purpose, we will be focusing on the fascia that surrounds the muscles (myofascia). The technique called myofascial release (MFR) is like self massage. Doing regular MFR helps to create easier movement between the muscles and the fascia. Like we discussed last week, the fascia most often becomes bound from asking our muscles to constantly contract in a way that is not in their natural design. This typically happens through poor movement or poor posture.
The following myofacial release series is designed to address the fascia specific areas of your body that are most prone to getting bound up due to our modern lifestyle.
Before we get to the video demonstration, let’s go over a few ground rules for myofascial release:
Stay off of bones! Myofacial release is for soft tissue only, rolling over bones will be painful and without any benefit.
Be patient. While you should notice that your body generally feels better after doing myofacial release, the painful areas in your body will not just suddenly disappear with a week of practice. It took these muscles years of the same treatment day in and day out to get bound up, and it will take time and consistency on your part to get them to release.
Start slow. We up to longer times over the course of the next few weeks mainly because it will take your body some time develop a bit more stamina to be able to support yourself while holding these positions. The sweet spot is between 2-5 minutes per muscle.
Keep a normal breathing pattern. If the tool you are using for MFR or the pressure you are using is causing you to hold your breath or change your breathing patterns, then back off a bit or get a softer tool. Normal slow deep breathing is your guide for the MFR release series.
Hydrate. Muscles are predominantly made up of water, dehydration will slow your progress. Aim for a minimum of ½ your body weight in ounces of water with a pinch of sea salt, and ideally some minerals.
Let’s get started:
The video below will take you through the technique of MFR for the series of muscles we will be focusing on in the first phase of our mobility series. Three to five times week, spend a minute on each muscle, going through the series in order. I’l l show you how to use three different tools to achieve the release techniques, a foam roller, a firm rubber ball, and a kettlebell.
Areas we will focus on: Front of the Thigh (Quads) , Outer Thigh (IT band), Rear end (Glutes), Back of thigh (Hamstrings), Inner Thigh (Adductors) , Low back/flank (Quadratus Lumborum), Back of lower leg (Calves), Belly (Abdomen), and Chest (Pectoralis Group).
Front of the Thigh (Quadriceps)
This muscle group has the job of bringing your knee to your chest and bringing your knee from a bent to straight position. Issues in this muscle group has a direct relationship to issues in the knee. Being seated most of the day makes this muscle short and tight restricting your ability to stride properly when walking causing other muscles to have to take on the job of moving you forward.
MFR: Lie on the floor face down propped up on your elbows with your free leg pulled up and off to the side of your body to help your arms support your weight. Place one thigh directly on top of the tool you are using directly in the center of the thigh starting close to the top of the hip and slowly working your way down towards the knee scanning for and making note of the most tender spots. Once you’ve scanned the length of your thigh from your hip to your knee, return your attention to the most tender spots, spending the remainder of your time with your thigh directly on top of the most tender spot. While there, make sure to use deep breathing as you do small circles, hold pressure, or do very slow knee bending.

Quad MFR
Outer Thigh (IT band)
The muscles of the outer thigh are involved in supporting the leg while standing as well as moving through the gait cycle. As with the quad group, this muscle gets short and tight when in a chronic seated position. If there is an asymmetry in the hips, the IT band will cause the hip to shift and rotate.
MFR: Lie on the floor on your side propped up on your down side forearm or hand. Your free leg will be forward and up across your body helping your arms support your weight. Your leg to be worked on will be straight. Place one thigh directly on top of the tool you are using directly on the outer aspect of the thigh starting close to the top of the hip and slowly working your way down towards the knee scanning for and making note of the most tender spots. Once you’ve scanned the length of your thigh from your hip to your knee, return your attention to the most tender spots, spending the remainder of your time with your thigh directly on top of the most tender spot. While applying pressure, make sure to use deep breathing as you do small circles, or simply hold position.

IT Band MFR
Rear end (Glutes)
The cascade effect of tightness as a direct result of prolonged sitting causes the glutes to have to work in different ways than intended or shut down completely because the tight quadriceps are restricting their ability to activate properly.
MFR: Sit on the floor facing with your hands behind you to support your weight. Place one butt cheek directly on top of the tool you are using directly in the center of the glute, take that same side leg (if you can) and cross it over free leg to better open up the hip. If this is not possible, simply leg the same side leg rotate out to the side. Starting in the middle slowly working your way down towards the knee scanning for and making note the most tender spots. Once you’ve scanned the circumference of your glute, return your attention to the most tender spots, spending the remainder of your time with pressure directly on top of the most tender spot. Make sure to use deep breathing as you do small circles, hold pressure, or do very knee movements. Drop down to your elbows if your arms get tired.

Glute MFR
Back of thigh (Hamstrings)
When you spend most of your time sitting, your pelvis gets stuck in a flexed position that it can’t quite get out of when you stand. From the standing position your pelvis is like a bowl of soup spilling soup down your front. Because of this, the body pushes the whole hip forward to balance out the tilt causing the back of your leg muscles to get overworked trying to stabilize the pelvis in this position, especially while walking.
MFR: Sit on the floor on top of the tool you are using with your free leg pulled up and off to the side of your body and your working leg extended out in front of you. Place the back of the thigh directly on top of the tool you are using directly in the center of the hamstring close to the top of the hip where the leg and the buttocks meet. Stay as tall as possible through the spine, slowly folding your chest forward towards your knee and returning back. Don’t slouch! Make sure to use deep breathing as you do small movements or hold pressure.

Hamstring MFR
Inner Thigh (Adductors)
The muscles of your inner thigh help with bringing the leg to midline as well as hip flexion, so they are yet another muscle affected by the cascade effect of prolonged sitting. Additionally, the adductors will attempt to counter balance a hip hike caused by an imbalance between the left and right sides of the body.
MFR: Lie on the floor face down propped up on your elbows with your leg pulled up and off to the side of your body and your free leg extended out behind you. Place the inner thigh directly on top of the tool you are using directly on the midline of the leg starting close to the groin and slowly working your way down towards the knee scanning for and making note of the most tender spots. Once you’ve scanned the length of your thigh from your hip to your knee. Return your attention to the most tender spots, spending the remainder of your time with your thigh directly on top of the most tender spot. Make sure to use deep breathing as you do small circles, hold pressure, or do very slow knee bending.

Adductor MFR
Low back/flank (Quadratus Lumborum)
The quadratus lumborum is a muscle that runs between the rib cage and the hip bone along either side of the spine. When this muscle is out of balance, it wreaks havoc on the pelvis and can cause significant amounts of low back pain.
MFR: Lie on the floor face up propped up on your hands or elbows with your knees bent to support your weight. Place the tool you are using directly off center of the spine to one side or the other starting closer to the top of the hip and slowly working your way out towards the lateral hip making note of the most tender spots. Being sure to stay off the bones of the spine and the ribs, return your attention to the most tender spots, spending the remainder of your time with pressure directly on top of the most tender spot. While holding make sure to use deep breathing as you do small circles or hold pressure.
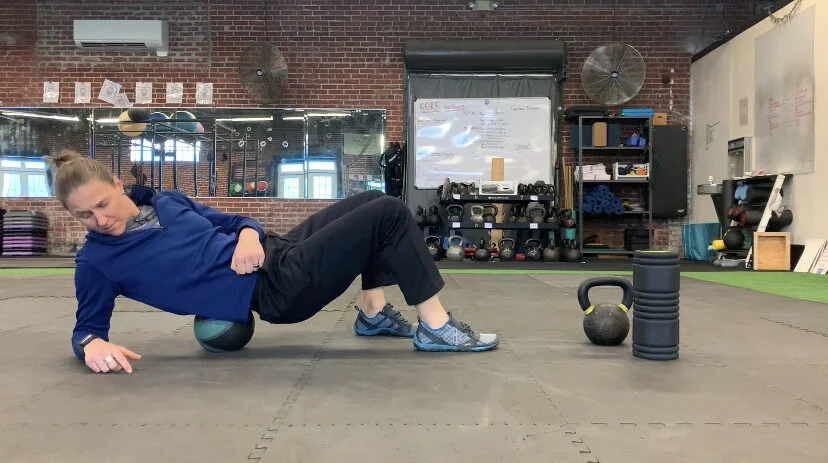
Quadratus Lumborum MFR
Back of lower leg (Calves)
The calf muscles run between your knee and foot and are workhorses and tend to get ignored completely until something like plantar fascia crops up. The aforementioned forward shifting of the pelvis puts even more load on the calves by shifting the body weight to the balls of the foot.
MFR: Sit on the floor propped up on your hand with your free leg crossed over your working leg. Place the back of the lower leg directly on top of the tool you are using directly in the center of the calf starting close to the top of the knee and slowly working your way down towards the ankle scanning for and making note of the most tender spots. Be sure to rotate your toe in and out as you scan to access the inner and outer aspects of the calf. Once you’ve scanned the length of the back of your lower legs from your knee to your ankle, return your attention to the most tender spots, spending the remainder of your time with your calf directly on top of the most tender spot. Make sure to use deep breathing as you do small circles, hold pressure, or do very slow ankle movements.

Calf MFR
Belly (Abdomen)
The muscles of the abdomen we are focusing on here are the ones that bring your rib cage closer to your pelvis in a “crunch-like” motion. In addition to causing your belly to protrude, these muscles also get short from prolonged “slouched” posture and block your ability to access your upper back muscles.
MFR: Lie on the floor face down propped up on your elbows with your legs extended out straight. Place one the tool you are using off to the side (never directly in the center) the sternum in the abdominal cavity under the rim of the ribcage. Gently allow your stomach muscles to relax and monitor your pressure by putting more weight into your arms. Let your breathing be your guide as this can be mildly uncomfortable initially.

Abdominal MFR
Chest (Pectoralis Group)
The muscles of the chest assist with pushing type motions, but with a chronically slouched posture, these muscles will also round the shoulders forward and internally rotate the upper arms turning your hands to a knuckles facing forward position. These rounded shoulders lead to a lot of neck and shoulder pain.
MFR: Lie on the floor face down, place one arm directly on top of the tool you are using directly under the collarbone and just inside the armpit region. Starting close to the shoulder and slowly working your way towards the sternum scanning for and making note of the most tender spots. Once you’ve scanned the length of your pec from your shoulder to your sternum, return your attention to the most tender spots, spending the remainder of your time with your chest directly on top of the most tender spot. Make sure to use deep breathing as you do small circles, hold pressure, or do very slow arm movements.

Pectoralis MFR
Follow Along Video